Ever complete a model but forget everything you did? So, when it came time to recreate a color or technique you couldn't remember how to do it? This happens to me ALL THE TIME. So I figured I would try something a little new for me. Gonna try and do a build log.
Due to a cross country move, I have been unable to work on anything for over a year. I have recently gotten my model "studio" (garage) set up and now have the chance to get started working on projects again. After more than a year I figure some skills and habits have atrophied so I want to pick a project to use as a "refresher". An inexpensive kit that I could exercise some old and try out some new techniques on.
That being said, a year or so ago I added a few inexpensive Revell model kits to my stash; the 1:48 P-50B Tiger Shark and 1:48 Spitfire Mk. II. These kits are "basic" in that they don't have many parts and are low on detail. A WWII kit seemed a perfect subject to start with, since mistakes may be more easily masked with heavier weathering more common on WWI aircraft than more modern jets.
I know I have been remiss in my updates and general posting activity but between basement flooding, more deaths in the family, summer vacation, bathroom remodeling and kids going off to college ... it's been a busy summer. Besides, my oldest daughter got me all into Skyrim (the video game) and so I am always having to beat back that distraction.
Skyrim ... distraction factory.
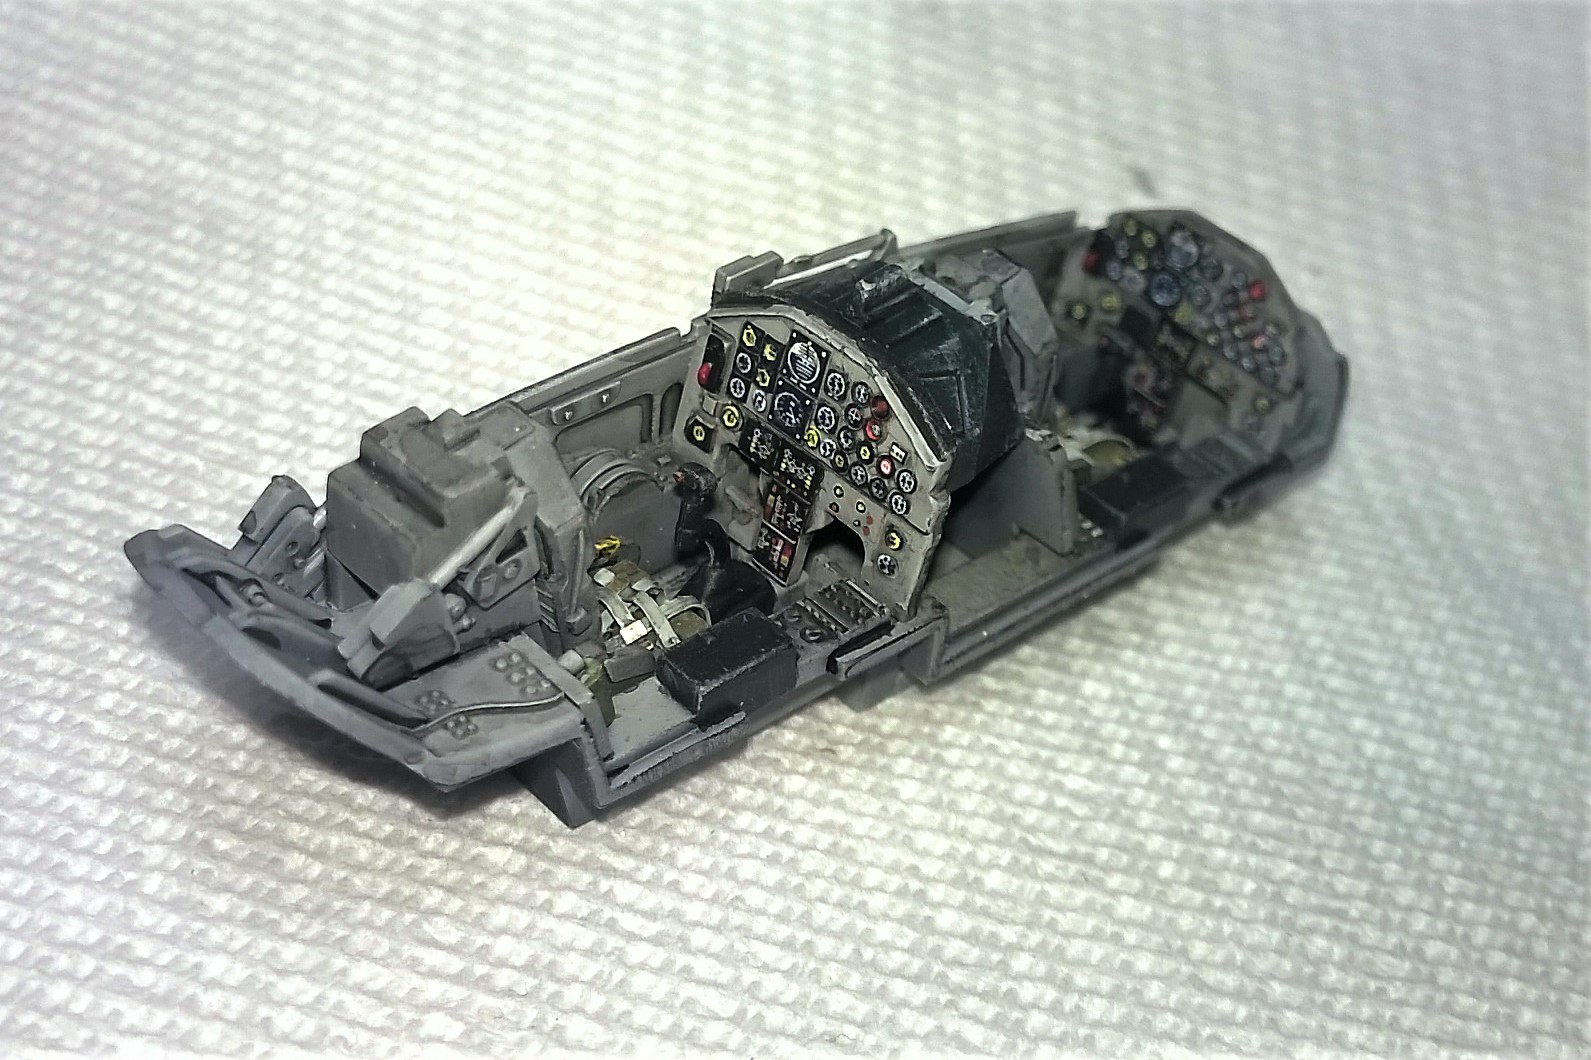
Since this blog has no followers though, you can imagine that my concern is pretty low. Perfect ... Not disappointing anyone today. Anyway ... I digress. Despite my long pause I have been making progress on the Trumpeter T-38A Talon "Principal Project". I had actually finished the cockpit several months ago. I must have mis-aligned when putting it in the fuselage however. The sides seemed to bow outward, leaving a considerable gap on either side of the coaming. Anyway that was enough to derail me for a several months. In the interim I took some really crappy photos with my phone of the cockpit fully painted and assembled (but not in the fuselage) and thought I would share them here. The instrument panel decals actually turned out pretty nice. In the forward seat I attempted to put them on as a single decal, and it turned out OK, but for the back seat I carefully separated the decals into smaller sections using my Exacto and everything lined up much more nicely. Micro-Sol really helped snug the decals into the details of the instrument panel and I was pleased with the results.
Cockpit Detail before wash and weathering applied. I tried to add "scuff" marks to the floor but it turned out looking like what it was ... someone scratching at the paint with a sharp tool. I'll have to figure out another way to do this convincingly.
This was also my first time working with PE (photoetch) and was encouraged with my progress. While I placed and configured the seat belts in all the wrong places, I suspect that unless you've ever strapped into one of these yourself, you probably wouldn't know the difference. The interior was painted largely in gull gray with a wash of Nato black (I think that's what it was). Combined with dry-brushing gull-gray I was pleased with the results. Of course, according to what I hear on forums and various online resources, these are fairly "old-school" and basic techniques, designed to make the inexperienced modeler feel better about their inexperience ... IT WORKED ... I loved the results!! :)
Rear Cockpit Detail - wash applied and PE in place.
Well ... I have started assembling the remainder of the aircraft. A fair amount of putty on the seams which makes me nervous as I am afraid of losing the fantastic detail included on the model. I am using tape to limit the impact of the putty and purchased dental picks to help me replace any lost panel lines ... I HATE SCRIBING ... so we'll see how that goes. If you're waiting for the next installment, I'd be shocked as no one even knows this blog exists! Regardless it will be here when my time and motivation converge. See you then.
If you've read my page on my "Principal Projects" you'll understand the importance of these special projects as compared to others I work on. If you don't know what I mean. please read my page on Principal Projects for details.
Today I want to begin to document one of those projects ... the T-38A Talon. Perhaps I should start with the T-37 Tweet, as my father did, but the T-37 involves natural metal finishes which I do not think I am prepared for yet, so I am starting with the T-38 instead.
From my father's memoirs ...
In July of 1963 my father, then 2nd Lt. Thomas Stenstrom and newly wed the week before, returned to his Squadron, the 3501st Pilot Training Squadron at Reese AFB, Lubbock, TX, from 4th of July break to begin Primary Pilot Training.
"Ours was the first flight in the squadron to fly the Northrop T-38 Talon instead of the old T-33 Shooting Star. The planes were brand new, right out of the factory and had that 'new car' smell. The plane was supersonic and looked like it was moving even when it was parked".
My Father standing next to one of the brand new T-38A Talon trainers.
The project
So my project is to reproduce the T-38 pictured in the photo above. The tail number of 23647 indicates that the funding for the plane was approved in 1962 and the fact that the photo was taken in 1963 would suggest that this was very likely the aircraft's first assignment. Therefor at the time my father encountered it, it would have been a brand new plane. This means that any heavy weathering would be inappropriate. Other than that, I do not know much about the history of the plane. From a search on the tail number I was able to discover that it was that it was ultimately transferred to the "Turkish AF as 23647", although I don't know when it was sold or what it was doing before then,
Some of the first kits I built, as I was realizing that building model kits was not as easy as all these videos make it look, were of T-38's. Inexpensive MiniCraft Hasegawa and Starfix kits became my lab rats. VERY basic and simple kits, the molds dated back to the 60's. Raised panel lines and absolutely ZERO cockpit detail was only the beginning of the challenges that they presented.
After conducting a little research I discovered that these were actually F-5B Freedom Fighters, and while based on the same air frame, possessed some minor differences, including wheel nose hub diameter, drag chute, air intakes, and inner forward wing root. Since I was just beginning I was not in any position to attempt modifying a kit. So I built a couple of these as test projects.
Starfix T-38 Talon build results w/ custom decals on Testors paper and minor mods to the wings.
I was not happy, but satisfied enough with these results, given my (lack of) experience. Most importantly I learned some lessons and had the opportunity to hone some skills. I even managed to successfully-ish execute some minor modifications.
Other efforts include a PM Model F-5B Freedom Fighter conversion to an T-38. These kits however, make even the fore-mentioned Hasegawa kits look like a contemporary Tamiya kit. Originally purchased for about $5.00 USD, however, I felt comfortable chopping and hacking this one up in an effort to working on scratch building and conversion skills and the ever important panel lining skill set.
PM F-5B Freedom Fighter model kit.
Panel line practice on the PM F-5B kit. I need more practice.
Aside: At the time I originally wrote this post (March 2017) I am seeing these kits being sold for $20 and up, which, in my opinion, is an insult. Even done well you can get much better kits for the same money. These kits are, at the $5 USD I paid, great for practice kits and mules you can use to experiment with and practice scratch built features. For $20 and more however, these are not kits you purchase to beat up and throw away (at least not on my budget). The amount of effort that would have to put into the build in order to get the value out of it is not worth it; not when you could spend the same money and get considerably nicer kits. It's my opinion that they can do this because there just isn't a selection of T-38 kits available right now. These kits aren't even genuine T-38's. This vacuum is being exploited and people are being gouged for these exceptionally sub-par kits. They are "vintage" but they aren't even that rare as they seem to be overpriced and everywhere.
Anyway, over the ensuing months I have also built several F-15's. F-14's and MiG-29's accumulating model building tools and supplies and further sharpening my skills. I think I have finally arrived at a place where I am comfortable enough that I am going to take a stab at a "real" T-38 kit.
Despite my efforts to keep everything in scale with my father's 1:72 scale C-130 Hercules I will be doing, there are no 1:72 scale T-38 kits on the market. It seems Sword had made a really nice one but I can't find it anywhere (if anyone knows where I can pick one up please let me know!). I do have a ERTL F-5B Freedom Fighter in 1:72 that, when I become comfortable enough with my ability to modify it, I will build as a T-38. It is nicely detailed but this is another kit I cannot find anymore of. This likely means I will only get one shot at it ... so until I am absolutely confident it will remain in my stash.
In the meantime I have conceded that in order to build a kit designed to be an actual T-38, I will have to up the scale to 1:48. Thus I have purchased the Trumpeter 1:48 T-38A Talon. This will become my first real swing at one of my principal projects.
1:48 Scale Trumpeter T-38A Talon
Kit Reviews and References
Much to my surprise there are not a lot of videos published on this kit. I have put together what I could find though. I suppose the T-38A is jut not that popular of a subject.
I purchased this Revell 1:48 scale MiG-29 Fulcrum with a 55% coupon at AC Moore Craft and Hobby store and walked away with it for just under $10 USD. So the kit would have to be pretty bad to not be worth the purchase (While AC Moore sells Revell kits in their physical store locations It doesn't appear that they sell this or any kits on the web site but you can find coupons there). It was worth every dime. I am not sure I would have paid too much more ... but for $10 ... yeah ... I'm in.
OK ... Typically intimidated by the amazing results I see of other model builders efforts, I tend to regard my own builds as something akin to the pasta art my children bring home from kindergarten. Thusly, I swore it would be a a long time before I had the cajones to post any of my personal build photos. In doing so now, howecer I am not suggesting for even a moment that this final reveal is anything on par with what I see on the various forums and sites that I frequent, but despite all that is wrong with it I was, overall, fairly pleased with the outcome of my 1:48 MiG-29 Fulcrum and decided I would share it with any who might be interested.
The Plan ...
I fell immediately in love with the design of the MiG-29 Fulcrum the moment I saw it. Even standing still, it was the fastest plane I had ever seen! Gorgeous
Inspired by the Discovery Wings "Red October" where German Luftwaffe 73rd Fighter Wing MiG-29's performed as an aggressor squadron against a couple of USAF F-18 squadrons (VFA-106 Replacement Air Group & VFC-12 Adversary Squadron) I decided to keep it all in the NATO family. I would build a German MiG-29 and follow up with a Revell 1:48 F-18 Super Hornet that I also purchased for $10 USD as one of the F/A-18 Squadron aircraft.. "Red October" for $20! Awesome!!
Kit Impressions
Keep in mind that I do not pay enough attention to details to concern myself with "rivet counting" or subtle profile changes in the noses or whatever. At this point in the hobby I limit myself to OOB builds focusing on construction and painting/weathering techniques. I did, however want to point out some of the more obvious "features" and quirks with the kit resonated poorly, even with me.
Panel Lines
The first thing that struck me was the stark detail. Hardly existent at all. Only a few raised panel lines on the fuselage and control surfaces but not much else. I typically hate raised panel lines as they tend to disappear when filling and sanding the kit and are not as easily weathered. The lack of panel detail, however, freed me to scribe detail to my own specifications. I had found a "blueprint" drawing online of the MiG-29 and used that as well as other model build references to determine where my panel lines should go and was able to "easily" scribe them in. It still sucked having to do it but at least I wasn't sanding away existing panel lines then having to start all over.
"Blueprint" showing panel lines.
Scale Details
One of the things that did not become apparent to me until I was nearly completed with the build was how out of scale some of the details were. For example there were several protrusions sticking out of the rear vertical stabilizers and on the front fuselage.
In the image above; the left image is from the real MiG-29 while the right image is from my final model. I am not sure what the function of these protrusions are but notice how much larger they are in relation to the rest of the surface on the model versus the real ones, which are considerably smaller, not to mention shaped completely different.
Also the antennae or whatever they are, just in front of the canopy was also mind-numbingly out of scale.
In the image of the real MiG-29 above you almost have to strain to see three thin, short rods rising vertically from the fuselage in front of the pilot. On the model you have to wonder if the pilot would even be able to see around them!! They are HUGE!
The rest of the "issues" with the model didn't bother me too much, but perhaps may be worth noting. There was no "mud guard" on the front landing gear, and also noticeable in the above photograph, the shielding on the gun was truncated considerably compared to the original.
It's only fair to point out however that the mold for this kit dates back to 1988 (according to Scalemates.com) with no changes other than packaging and decals over the past 30 years. This means that the mold was released during the height of the cold war when details of the MiG-29 may have still been somewhat hush-hush and details about it not available. While that excuses THIS kit it does leave me wondering why a newer tool of this beautiful air-frame has not been released. It certainly seems popular enough with many other manufacturers offering more current alternatives.
The Build
All things considered the build was fine. I am one of those who subscribes to the notion that a kit doesn't have to have that perfect BanDai snap together engineering in order to be good. This kit had it's share of challenges but that's what model building is supposed to be all about right? I think the worst fit issues I had were some stepping between halves of the engine modules and the join between the upper and lower fuselage near the nose; both requiring a fair amount of filler and sanding but neither was insurmountable. That and of course the panel line scribing, which I generally loathe for the tedious and boring-ness of the task. Otherwise it went together fairly well.
Since I don't have a whole lot of photos to show regarding the actual build I'll leave it at that.
Results
I snapped off a handful of photos of the final result. While there is plenty to find wrong with the results, I felt that there was a lot accomplished that represented forward progress in my overall model building skills, so I am all-in-all pretty pleased with it. Been struggling with the color scheme. Not a whole lot out there for the German Luftwaffe MiG-29 squadron, so I had to wing it as best as I could. I think I came close though ... I hope.
I have built several 1:72 scale F-15's. Lately, I have been deciding whether or not to buy a larger version of the F-15E Strike Eagle and I am definitely excited at the prospect. Without driving 30 minutes through the snow to the nearest hobby store however, I am limited to whatever I can find in my local Michael's or AC Moore craft stores. Both of whom have plastic scale modeling sections that leave very much to be desired.
Stocked with only Revell America kits the selection is tragically limiting, however I have found this Revell 1:48 scale F-15E Strike Eagle that by all accounts ... looks pretty good.
The number of you tube videos published on this specific kit is pretty limited but I have managed to discover a few in-box reviews as well as some useful links to articles on scale modeling sites which provide first impressions of not ony the kit but their own experiences building the kit.
Now what I have learned is that this kit is provided by both Revell America as well as Revell Germany and they appear to be, build-wise the same kit. So the links and videos include information on both.
Revell Germany kit box
Currently, at my local Michael's craft store the kit is retaining for about $40 USD, but there are always coupons available so I am hoping that I cross paths with a 50% off coupon and land one for about $20. That would be a great deal indeed!!
Online Kit and Build reviews
It seems that the only reviews I can find relate to the Revell of Germany version. I am assuming that these two versions of the kits are the same so I am posting links to them here.